Blog
SharePoint: Create you own sharing site
We see a lot of companies that use Microsoft SharePoint for their internal file management and then a separate service like box.com or Dropbox to share files with customers and suppliers. We have some good news – you don’t need to! You can create a separate, secure sharing site to share files with third parties using your SharePoint Online account.
Why do you want to share files?
We see a few different examples. Some people want to publish out files such as marketing materials, technical documentation, and so on, to their customers or potential customers. Some want to put out customer specific documents such as progress reports. Others want to receive information from suppliers, perhaps in a tender format. You can do all of this with SharePoint.
I don’t want to expose all my files to the internet!
We get that. It’s a real concern. Again, good news… you don’t have to. You can create a single site with the permissions to share publicly while the rest of your SharePoint environment remains limited to internal users, and perhaps to small groups within the business.
Why use SharePoint to share my files publicly?
SharePoint allows very specific controls on what is shared and how. You can share at the individual file level, and control whether that’s a general link that anyone can access or a limited link that will only work for named people. You can put time limits on, so a share expires after a certain period and you can control whether the people you are sharing with can download the files or just view in a browser, and whether they can edit the files.
Well that sounds marvellous, and it means only running one solution. How do I do it?
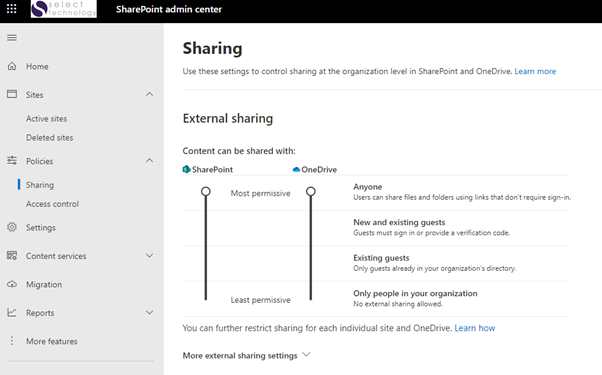
Firstly, you need your tenant admin to enable public sharing. We admit, this part feels a bit risky because of the way Microsoft designed it. But don’t worry – you’re setting a global permission for sites to be able to share publicly, but you can still choose at the site level whether they actually do.
You need to go to the SharePoint Admin Center (forgive the American spelling, not our fault) and set the Sharing Policy.
Of course, if you’re one of our customers you can just ask an authorised change approver to log a ticket and we will do it for you.
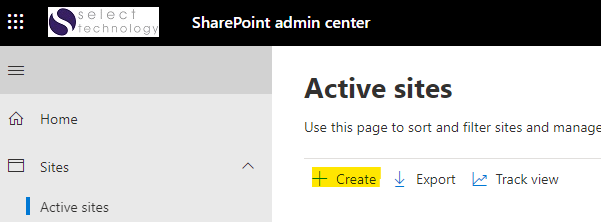
Once this setting is in place, go to Sites, Active Sites and hit ‘Create’.
As always you get the option to create either a ‘Team site’ or a ‘Communication site’. The difference is aesthetic – they can both do what we need here, but we generally choose Team site. Then you get this dialog screen:
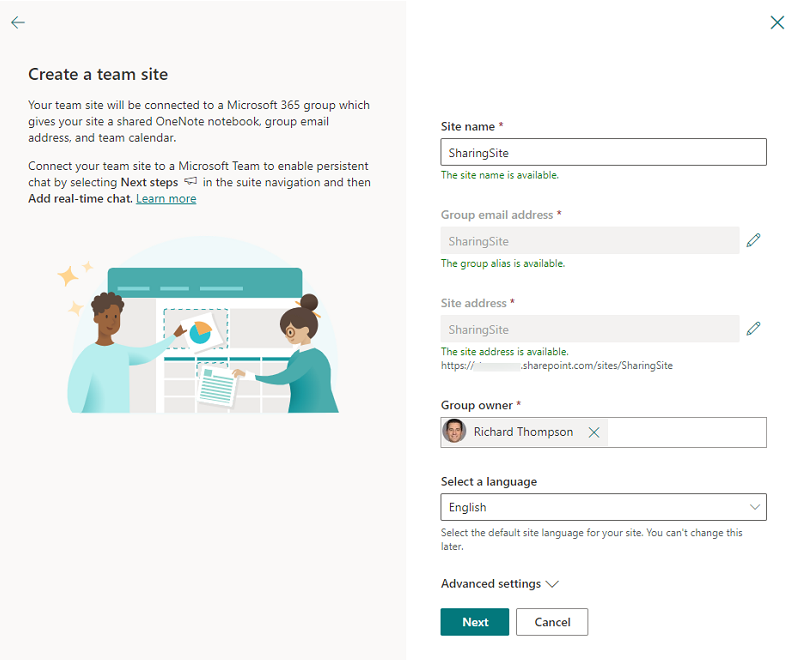
As you can see, you need to pick a memorable name for the site and a URL ‘stub’ (the bit at the end). You also need to specify at least one owner of the site. By the way, don’t try getting in touch with Richard for help – he doesn’t really exist!
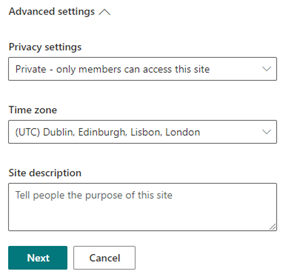
You’ll notice those ‘advanced settings’ at the bottom. That’s the privacy settings and the timezone, both worth looking at.
The privacy settings determine whether people can see the site in the directory and make themselves members of it. Typically we suggest setting the site to Private, allowing the site owner(s) to determine who has the rights to share publicly. Time zone should be set to the relevant time zone for your business – this is important if you are planning to use the option to expire links.
Click next and you’re ready to go. You can add members to the site immediately, but we usually get everything set up and then add the members later.
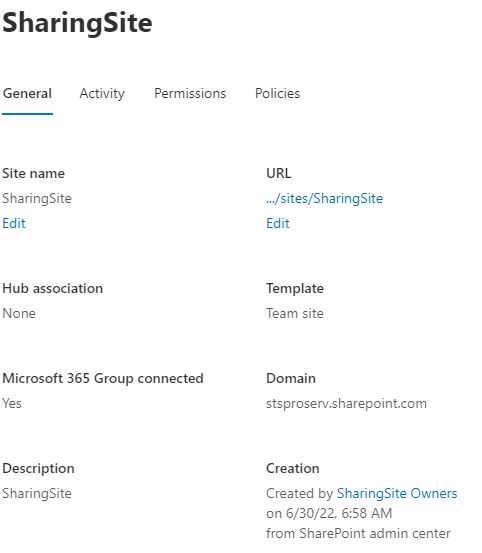
Once you’ve created the site, you need to make one more change. Find the site in your list of active sites and click on it. This will open another dialog like this one.
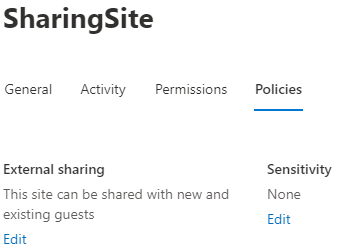
Click on ‘Policies’ and you will see a page like this ➡
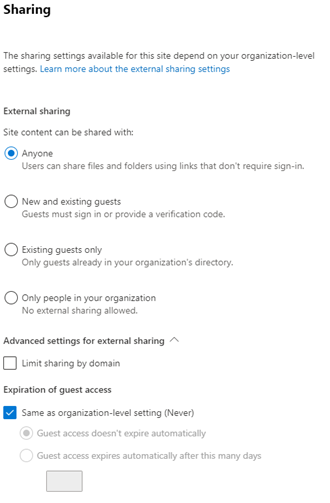
You need to click Edit under ‘External sharing’ and change the setting to ‘Anyone’, as below. This is the bit that we talked about earlier – even though the tenant setting allows it, you still have to specifically choose it on each site, so there’s no risk of doing it accidentally.
In terms of set up, that’s it!
Great – so how do I start sharing files?
Great – so how do I start sharing files?
This is the bit that makes it worthwhile. Simply upload a file to the Document Library and hover your mouse over the file name. You’ll see a ‘Share’ icon appear (the box with the arrow in this image).
First you’ll see a dialog to tell the software who to share the file with. And at the top there’s a link marked ‘Anyone with the link can edit’.

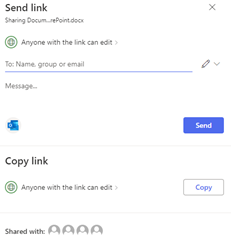
That’s the default setting, but you can change it.
- Anyone with the link
- This means that anyone in the world with the link can access the file with no further authentication. This is suitable for marketing documents, published brochures, etc.
- People in {company name} with the link
- This will work for anyone in your company, but they will have to sign in to access the file. It will not work if anyone sends the link outside the company
- People with existing access
- This does not grant anyone new permissions. It’s quite useful for reminding someone of a file you’ve worked on together already, or sharing a new file in a site where you know the other person is already a member
- Specific people
- This is the really useful one. If you were to use this to send a link to [email protected], Fred would receive an email saying he had been sent a link, just like with the other options. The difference is when Fred tries to access the file the software will send another email with a one-time password, and Fred has to enter that before he can access the file. And of course, if he forwards the email to anyone else it won’t work since all future one-time passwords will come back to Fred.
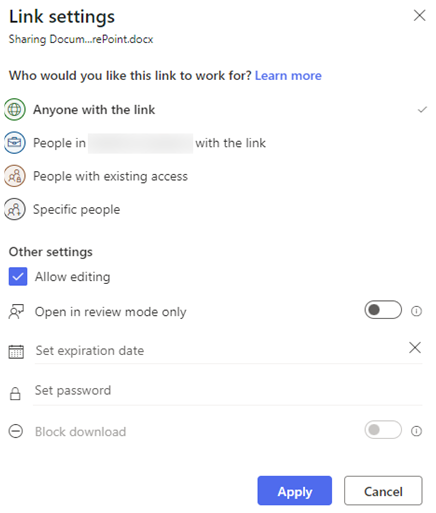
On the same dialog you can see the extra settings like allowing download, allowing editing, setting an expiration date or setting a custom password for a file. All very useful features, we think you’ll agree!
What if I want people to use the site to send files to me?
You can do that, but there’s an extra step. You need to add those people as members, just like you would on other file sharing sites. This is to stop internet randos from uploading stuff. But be careful! If you make them members they will also be able to see everything else in the site.
If you’re planning to do this with commercially sensitive information it makes sense to have a separate site for each customer or supplier. That’s true on other file sharing sites as well, of course!

Nick Ellis
Customer Experience Manager